Setting up Field Template in Contacts
Why Set up Templates?
For example, you need a field that is not in the System. Create it using template.
Other options are also available to you: renaming, duplicating, length changing, moving, and removing fields.
How to Work with Templates?
Who can Customize Templates?
The administrator of the workspace. He can change templates for groups of objects.
Where Can I Set up a Field Template in Groups?
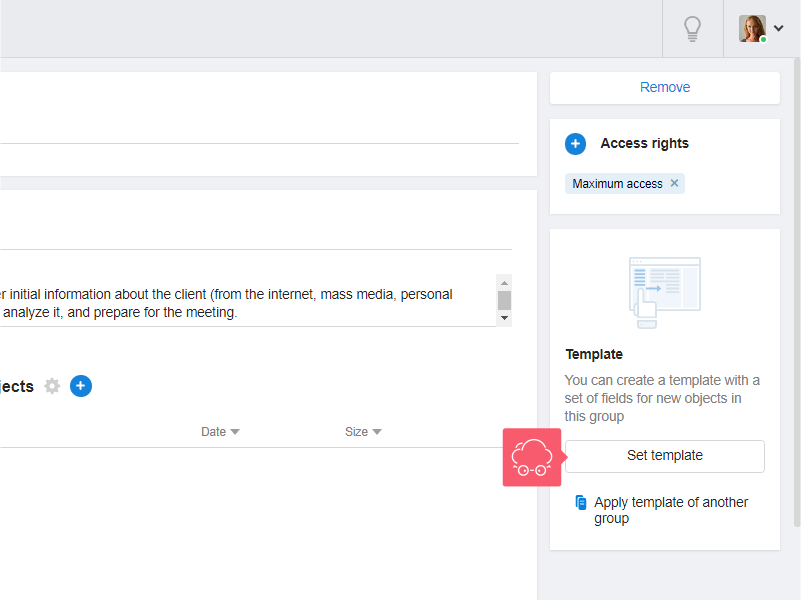
- Go to the Group settings page. Learn how to go to the Group settings page.
- Click Set template. This opens the Customize template page, where field actions are available.
Changes in this template apply to all objects in the group.
How to Find the Right Field?
- Go to the Customize template page. To learn how to do this, read the Where Can I Set up a Field Template in Groups? paragraph above.
- In the left pane, select Main information or Additional information, depending on where the field is located.
How to Create a Field?
- Go to the Customize template page.
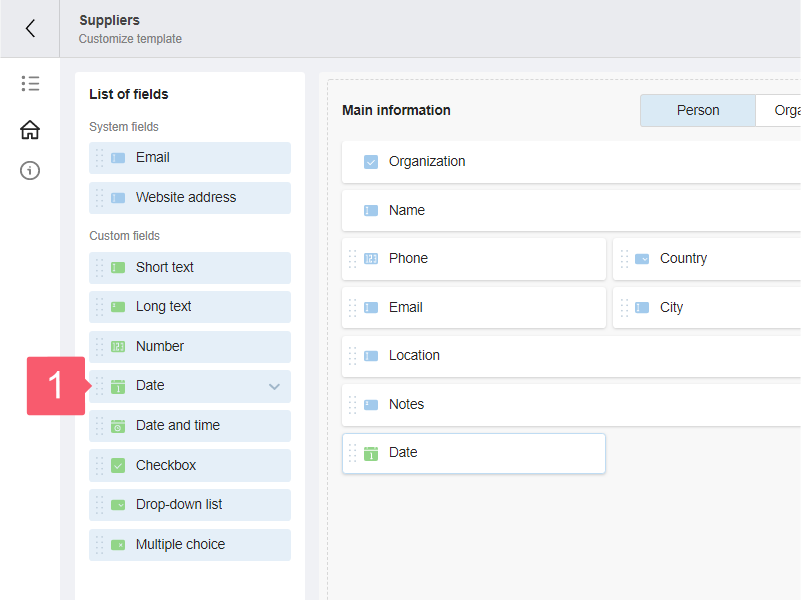
- On the left side of the screen, in the List of fields area, select the field type.
- System fields. You can create them if you previously removed them from the template.
- Custom fields:
- Short text;
- Long text;
- Number;
- Date;
- Date and time;
- Checkbox;
- Drop-down list;
- Multiple choice.
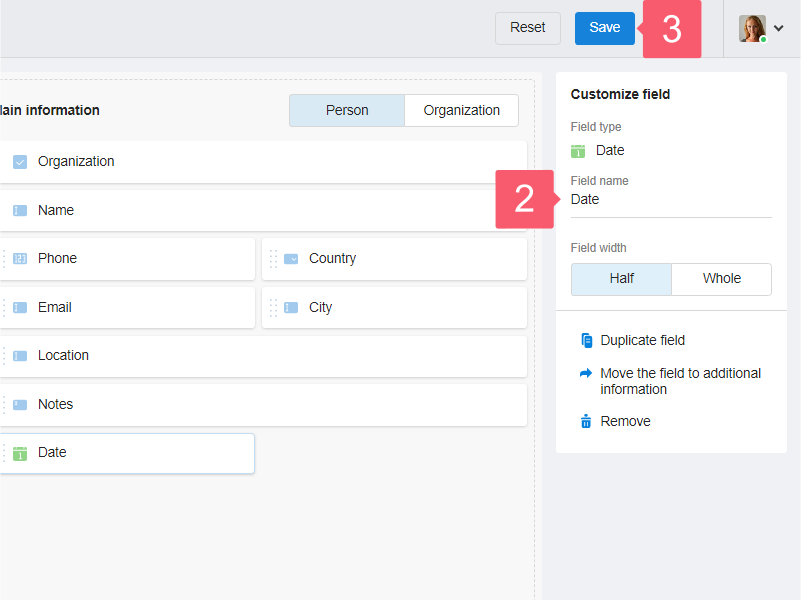
- If you create a custom field, enter its name and other parameters in the Customize field area on the right. The name must be unique.
- The created field is displayed in the middle of the Main / Additional information area.
- Click Save at the top of the screen.
The template can have no more than 50 fields.
How to Use a Previously Created Field in Some Other Template?
- Go to the Customize template page.
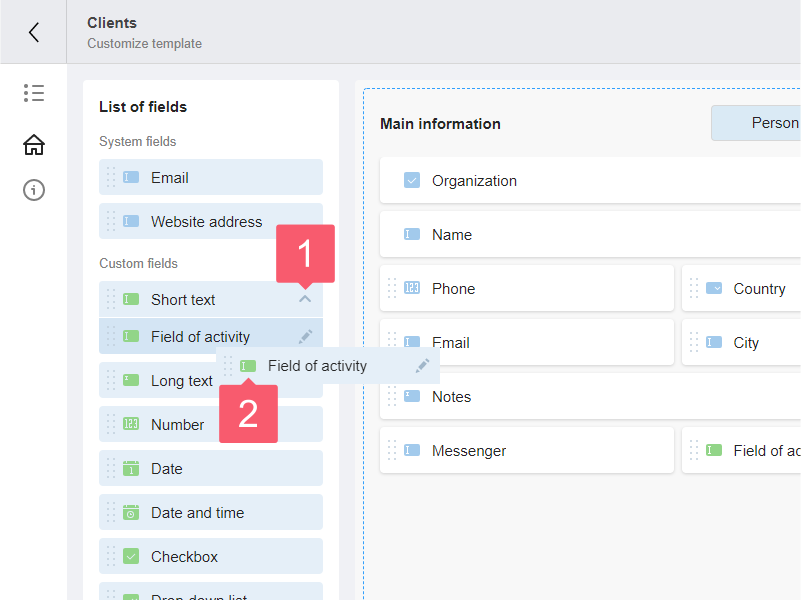
- On the left side of the screen, in the List of fields area, find the field type. Pay attention to the numbers for each type of field. They show how many fields of this type have already been created in the System.
- Click on the field type to expand the list of fields.
- To add a field to the Main/Additional information area, simply click on the field or drag it manually.
- Click Save at the top of the screen.
How to Rename a Field?
- Find the desired field.
- If the field is in the Main/Additional information area, click on the field. On the right, in the Customize field area, edit the name.
- If the field is in the List of fields area, find the pencil icon on the field and click on it. In the window that appears, rename the field and click Save.
- At the top of the screen, click Save.
Only custom fields are renamed.
How to Change the Field Length?
- Find the required field and click on it.
- In the Customize field area, select Half or Whole.
- At the top of the screen, click Save.
How to Duplicate a Field?
- Duplicate it in either of two ways:
- hover over the field and select Duplicate from the icons that appear;
- click the field and in the Customize field area click Duplicate field.
- In the Customize field area, type the name. It must be unique.
- At the top of the screen, click Save.
Only custom fields are duplicated.
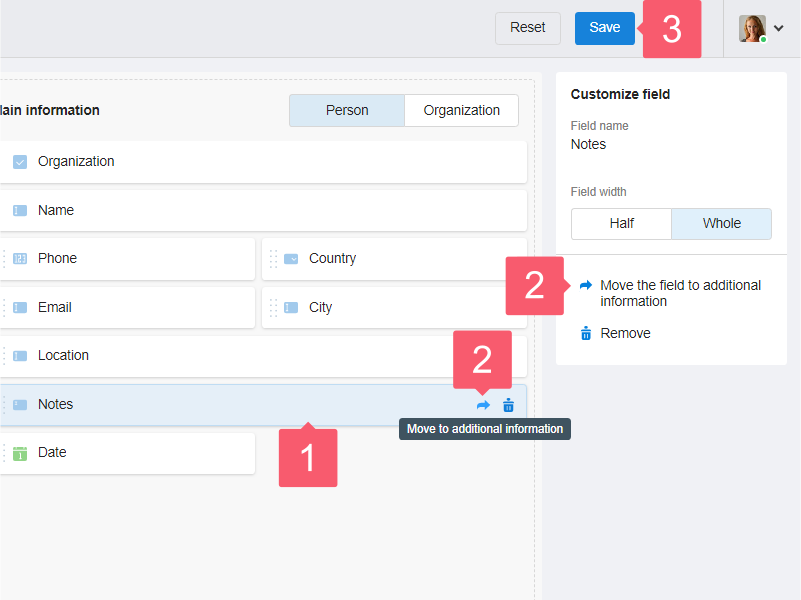
How to Move the Field Between the Main and Additional Information?
- Move it in either of two ways:
- hover over the field and select Move to Main / Additional information from the icons that appear;
- click on the field and in the Customize field area click Move to Main / Additional information.
- At the top of the screen, click Save.
How to Change the Order of Fields?
- Click on the desired field.
- Move the field to the desired area.
- At the top of the screen, click Save.
The Organization, Name, and Name of organization fields cannot be moved. They always appear at the top of the screen.
How to Remove the Field?
- Remove it in either of two ways:
- hover over the field and select Remove from the icons that appear;
- click the field and in the Customize field area, click Remove.
- In the window that appears, select where to delete the field:
- Remove from template;
- Remove from template and objects. Removing the field from the template and objects, you also remove all the information stored in the field from all objects of the group.
- At the top of the screen, click Save.
What is the Difference Between the System and Custom Fields?
The System fields are added to Smarty CRM by default. The custom ones are added by you.
Limits
Creation of custom fields is available only on the Premium rate plan. More…
If you switch from the Premium plan to a less advanced plan, the created fields are blocked. However, you will be able to view the entered information, move, change the order and size of the created fields.
